Home Construction Process in Nepal- Part 2
It’s a hot afternoon on site. Contractor Kaka is guiding the workers as they tie reinforcement bars. Engineer Babu walks in, holding the structural drawings.
Babu says:
“Kaka, yesterday we completed the first 4 steps (Planning). Today we move ahead with House Construction Process 2026 – Steps 5 to 8. I’ll explain the technical side, and you show the real site work, mistakes, and correct methods.”
Kaka lights a cigarette and replies:
“Babu, now planning is done — real construction begins. If structural design is weak, the house won’t survive an earthquake. Today I’ll show you how things actually work on site – from 26 years of experience. Without proper ductile detailing as per NBC 105:2025, no structure is truly strong. Let’s start.”

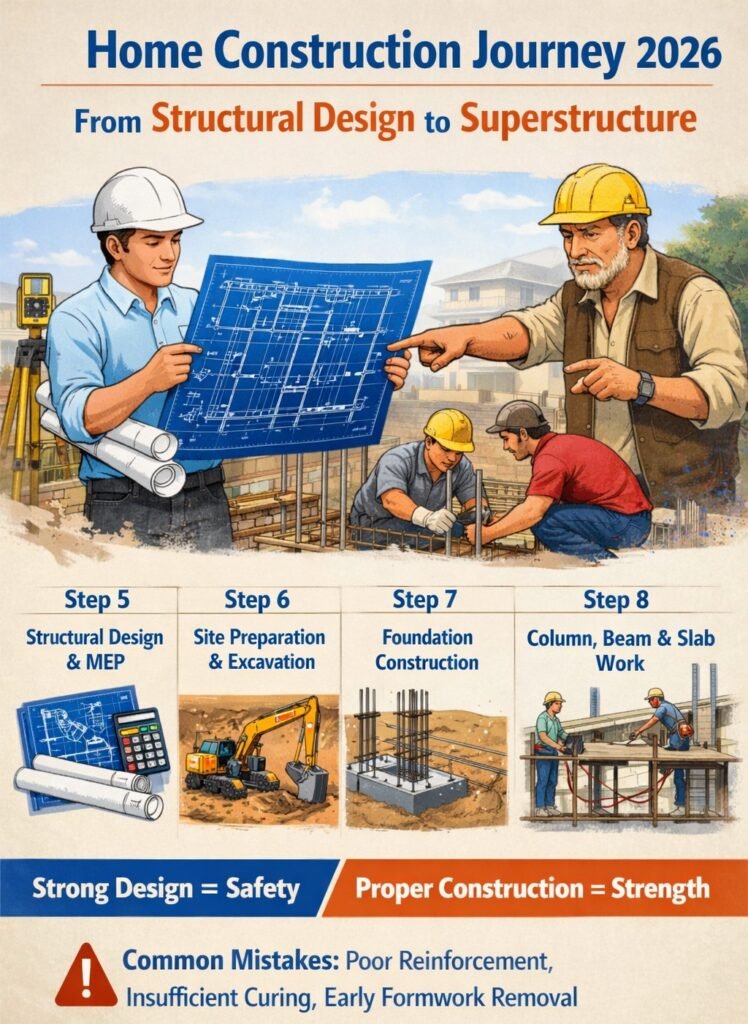
In this episode home construction process in Nepal (Part 2 of 16 steps):
- Step 5: Structural Design & Engineering (with MEP Planning)
- Step 6: Site Preparation & Excavation
- Step 7: Foundation Construction
- Step 8: Superstructure – Column, Beam & Slab
Engineer Babu explains technical planning based on NBC/IS codes, while Contractor Kaka shares practical site knowledge — reinforcement, concreting, curing, and real mistakes.
Step 5: Structural Design & Engineering (Including MEP)
Architectural drawings decide how the house looks.
Structural design decides how strong it is.
Engineer Babu spreads a large blue structural drawing. Kaka adjusts his glasses and studies the bar detailing.
Babu explains:
“This step is about creating the skeleton of the house. A licensed structural engineer calculates loads and earthquake resistance as per NBC 105:2025.”
Babu’s Technical Checklist
1. Load Calculation
- Dead Load (self weight)
- Live Load (people, furniture)
- Seismic Load (earthquake force)
2. Earthquake-Resistant Design
- Ductile Detailing: bars are bent and tied to absorb shock
- Lap Length: minimum 40d–60d overlap
- Material: Fe500D steel + M20/M25 concrete
3. MEP Planning
- Electrical conduit layout
- Plumbing slope (1:40 to 1:60)
- Solar system provision (2026 standard)
Contractor Kaka’s Reality Check
“Even if the drawing is perfect, mistakes in bar tying will ruin everything.”
- Weak joints → first failure in earthquake
- Always add extra stirrups at joints
- Use proper concrete cover blocks (not stones)
- Use chairs for double mesh
Babu’s Note: “Freeze the Design”
Once finalized, do not change layout on site.
Random changes = unsafe structure + code violation.
Step 6: Site Preparation & Excavation
Planning is done. Now ground work begins.
Kaka marks the site using lime and measuring tape. Babu checks alignment digitally.
Kaka says:
“Starting excavation without proper layout is like jumping in the dark.”
Practical Process
- Cleaning – Remove topsoil (15–30 cm)
- Center Line Marking – Mark columns precisely
- Excavation – Depth: 1.2m to 3m
- Shoring – Support loose soil
- Leveling with Batter Boards
Kaka’s Warning
“One inch mistake can cost lakhs.”
He shares a real case:
A 1 ft marking error led to a column inside the neighbor’s land → Rs. 2 lakh loss.
Babu’s Technical Tip
- Never pour concrete on muddy surface
- Use dewatering if groundwater appears
- Follow NBC depth & width strictly
Step 7: Foundation Construction
Now the roots of the house are built.
Kaka personally supervises reinforcement. Babu checks column alignment.
Kaka says:
“The life of the house depends on the foundation. People spend lakhs on finishing but compromise here.”Foundation Steps
1. Compaction
Tighten soil using rammer
2. Soling (Must-do layer)
- 150–225 mm stone/brick layer
- Distributes load + blocks moisture
3. PCC Base (M10)
- 50–75 mm thick
- Creates working platform
4. Reinforcement
- Hooks (90° bend) for anchorage
- 50 mm cover using spacers
- Chairs for double mesh
5. Concrete Pouring
- Use M20/M25
- Use vibrator (avoid air gaps)
6. Curing & Protection
- 7–14 days curing
- Anti-termite + waterproofing
Kaka’s 26-Year Experience
- No hooks → bars slip
- No cover → rust starts in 2 years
- Weak binding → mesh moves during pouring
Step 8: Superstructure (Column, Beam & Slab)
Now the structure rises above ground.
Kaka stands on shuttering, checking levels. Babu measures reinforcement spacing.
Column & Beam Work
- Minimum 8 vertical bars in columns
- Stirrup spacing: 100–150 mm
- Closer spacing at joints
Most critical area = beam-column joint
Formwork
- Must be straight (check with plumb)
- Poor fixing = leakage + honeycombing
Concrete
- Use vibrator
- Never add extra water
Slab Casting
- Strong shuttering support
- Double mesh with chairs
- Check electrical/plumbing before casting
Curing
- 14–21 days (Water ponding method)
Kaka’s Site Truth
- Don’t remove formwork early (minimum 14–21 days)
- Don’t load slab early → causes sagging
- Poor curing → cracks like spider web
Babu’s Note: RMC vs Site Mix
| Type | Advantage | Risk |
|---|---|---|
| RMC | Uniform quality | Higher cost |
| Site Mix | Cheaper | Human error |
For bigger spans or multi-storey → use RMC
Common Mistakes (Avoid These)
- No ductile detailing → earthquake risk
- No cover/chair → corrosion
- No curing → cracks
- Early formwork removal → collapse risk
2026 Cost Example (1500 sq.ft house)
- Structural Design: Rs. 1.5–2.5 lakh
- Excavation + Foundation: Rs. 8–12 lakh
- Superstructure: Rs. 15–20 lakh
FAQ
1. Is a structural engineer mandatory?
Yes. As per NBC 105:2025, it is compulsory.
2. Why use chairs in foundation?
To maintain spacing between reinforcement layers.
3. How long should curing be done?
Minimum 14 days (best: water ponding).
Conclusion: Design + Execution = Strength
Kaka:
“60% of house strength is decided in Steps 5-8.”
Babu:
“Good design gives safety. Proper construction gives life.”
Call to Action
- Use Footing & BBS Calculator on your tools site
- Get full Structural BOQ at Rs. 999 (WhatsApp)
- For Part 1 Home Construction Process in Nepal Part 1: From Land Selection to Design with Legal Advice – Nirman Sutra
- Subscribe for Part 3 (Steps 9–12: Masonry to Finishing)
1 thought on “Home Construction Process in Nepal Part 2: From Structural Design to deadly Superstructure”